top of page


A Guide to assist in setting up Windows with SDRPlay/SDR # and Decoding software for Meteor M N2 Weather Satellite
Hello, welcome to this tutorial on setting up Your SDRPlay with an older version of the EXTIO Installer that interfaces with SDR #, along with an older version of SDR#. It has a lot of additional plugins pre-installed, but you can can change that at some point in time (so its a little slow to start). it works for what we want to do.
As of this Tutorial, Newer versions of SDR Sharp and the EXTIO for SDRPlay are not playing nicely with the QPSK plugin that is required for capturing the DATA from the Satellite.
As if to say, Perhaps don't make this your main radio, and enjoy the benefits of the latest drivers for everything else you do in another SDR Sharp Folder.
Ok , first of all, Follow the links below and download everything so that it's ready when You need it, and for simplcity save it to your Desktop. Just to say, there is a large IQ file of about 350MB, its optional if you download it , if you are confident with what to do, then by all means skip downloading it. There is also a .s file, this is outputed by the QPSK Plugin for SDR# and contains the Data that is later loaded into LRPT offline Decoder. So if You want to skip making a file yourself, then mine is there for you to try.
IQ File
https://www.dropbox.com/s/11h6webppnl0pxr/11-13-00_137874kHz.wav?dl=0
.s File (not required if you are downloading the IQ file above)
https://www.dropbox.com/s/0eeto75gq0gcvx9/2016_03_27_LRPT_11-57-27.s?dl=0
Old Version of SDR Sharp with additional plugins (RAR File)
https://www.dropbox.com/s/0g45kjk6jtlte88/SDR%231337%20All%20Plugins.rar?dl=0
EXTIO 2.1, QSPK Demodulator 1.4
https://www.dropbox.com/s/31jvnkfxbq1cegr/Meteor%20tools.zip?dl=0
Smooth Meteor
http://leshamilton.co.uk/meteor3m.htm
LRPT Image Processor
http://www.satsignal.eu/software/LRPT-processor.html
LRPT Decoder
http://185.26.115.106/
Guide Starts Here (click images to expand)
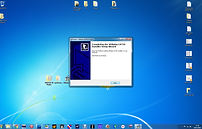
Extract SDR Sharp to Your Desktop


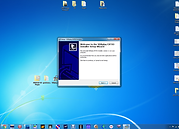
Extract the Meteor Tools Zip to your Desktop, open the qspkdemodulator folder, copy the contents of the folder and paste them into the SDR Sharp folder that you just saved on your Desktop.


Look for the file in the SDR Sharp Folder called plugins.xml, right click on it and open with notepad.
Copy the following line of Text, and paste it at the bottom of the plugins.xml doccument, as shown in the picture, save it and close it.
<add key="QPSK" value="SDRSharp.QPSK.QPSKPlugin,SDRSharp.QPSK" />


Locate the SDRplay_EXTIO_Installer_v2.1 file that You previously extracted from the Meteor Tools zip, run it and follow the instructions. Follow the guide if You get stuck.


So that's SDR Sharp Set up, We will look at LRPT offline Decoder, and smooth Meteor Later in this Tutorial. So go ahead and make sure SDR Sharp is working, remembering to slect the EXTIO for SDRPlay as the source. As I stated Earlier, it will take a short while to start up, so stay calm, You might have to expand and collapse a few of the plugins if the list lis too long, but You will find QPSK Demodulator at the bottom of the list.
Create a folder on Your Desktop Called Meteor
Here is a list of things to do in SDR Sharp
Set the Frequency as 137.900.000
Under radio Select WFM, set the Bandwidth to 120000 and put a tick in the correct IQ box
Under Audio, make sure Filter Audio is Un-ticked

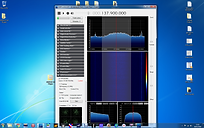
Now go to the QSPK Demodulator Plugin
At times when you are going to use it, put a tick in th Demodulator box, Set output as file, and Constellation as out.
Now open the Config tab at the bottom of the plugin, As default the PLL is set to 100. give this a try, but what works for me is a value between 210 and 250
Under Recorder, select the Meteor Folder that You Created on Your Desktop.

It might be a good idea to close SDR Sharp, and re-open it, so that the settings are retained.
So Here is where the Fun Starts...
This next section is optional, we are going to go through the porcess of capturing the signal with QPSK Demodulator, and create a .s file that will be saved in your Meteor Folder. alternatively, join in again when I talk about LRPT offline Decoder and use the .s file I provide a link to at the start of this tutorial.
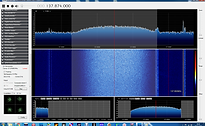
Open SDR Sharp and go to source, this time Select IQ File, and locate the Large IQ Wav File you downloaded earlier. For some reason the IQ File Reports the Centre Frequency as 137.874MHZ, I'm not sure why that was, but usually , you will tune to 137.900MHZ. Press the play button in SDR Sharp, scroll down to the QPSK demodulator and click start, after a short while, you will see the signal apearing in the waterfall, there is nothing to hear ( as its digital) other than when Meteor M N2 resets every 6 minutes. You can see an example of when it resets in the image below where the signal is strongest. when the signal is strong eonugh, the Red 'LOCK' Text will show in the QPSK Demodulator Plugin and you will have a good constellation , after 12 or so minutes th signal will start to fade, as will the lock. once this happens, press stop on the QPSK demodulator, then stop and close SDR Sharp. Remember to change it back to the EXTIO Driver next time you use SDR Sharp!


You will now have a .s file located in the Meteor Folder.
Open LRPT offline Decoder, Select 72K and choose the .s File from the Meteor Folder, or move the .s file you downloaded ealier to the Meteor folder, and open that instead. The reason I say this is becouse, LRPT will create additional files during the process. These can be deleted after completion, and its just a bit tidier having everything in one place!


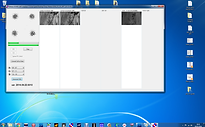


As You can see above, and hopefully in your own test, you now have an image displaying 3 Channels. Change B to 0.7 -1.1
Change B to 0.7 -1.1

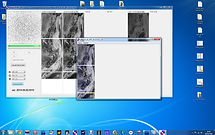
Now press Generate RGB and select Save in the New Window, If you are using the version that I proivided, You will not see anything happen when you click save, but it will save a BMP in the Meteor Folder. If however You downloaded the latest AMIGOS Version, you will get an option to save as JPG or BMP. I know bit maps are larger, but they are much better quality than the Jpeg.
We are nearly there. You now have a colour Image, but its a little bit stretched, so we are now going to use Smooth Meteor to rectify the width of the Image. so go ahead and open Smooth Meteor, Select Load Image from the Bottom Left, Then Select Rectify. Once its done then select Save as BMP in the First window. You will now have a rectified Image in Your Meteor Folder. so we are done. Well almost ;-)
If you wish to try this at night, do everthing as above, but when you load the Image into LRPT offline Decoder and its finnished processing, Change all 3 Values to 10.5 - 11.5, click generate RGB, and when you load it it into smooth Meteor You can select Flip N/S and then Rectify the Image. This will ensure that the image is the correct way around.
Great, You have an Infra Red Image, but with Little detail, so its time to introduce the last bit of software that we downloaded called LRPT Image Processor. Start it up, load the rectified Image, If your Image is not showing, then change Image Files to all files. This will automatically output several different Images, including an Infra Red Image. If in future You only want the Infra red Image and not the others, You can change this in options/setup, and untick the ones that You do not require.
I hope this helps You get underway, and gives you something interesting to try with Your SDRPlay.
In an Ideal world, You will use either a Turnstile or a QFH antenna tuned to 137.5 or thereabouts with right hand circular polarization. You should at least get some Result with a Discone or other outdoor Antenna, but don't expect a pass as long as the one You just tried.
There is plenty of information on Making a QFH to be found, I have some links on this site.
The final thing to add, is that this can be done in real time, and You will find Information on the Page where You downloaded the AMIGOS Version of LRPT offline Decoder. Personally, I prefer to do it this way.
And before You wrecklessly delete all of the plugins from this installation, its worth keeping the baseband Recordcorder. its great if you are going to be out, but want to capture more than one pass. As if to say, dont leave QPSK on all day and hope to decode all 3 passes, as You will only get the first one it captured.
Anyway, I wish You good Luck
Pete
bottom of page